9/04/2024

Understanding DoS Attacks

  **       **       **
** ** **
|\**/| |\**/| |\**/| \ == / \ == / \ == / | | | | | |
|__| |__| |__| \ / \ / \ / \/  \/ \/

A DoS (Denial-of-Service) attack targets a network/server and floods it with network traffic, ultimately causing service disruption by overloading the target network and causing it to crash. To have a better understanding of DoS attacks on the network level, we need to understand how network traffic is transported. Network traffic is broken up and sent via data packets to the destination. 

An ICMP flood attack is a type of DoS attack performed by an attacker repeatedly sending Internet Control Message Protocol (ICMP) packets to a network server. This forces the targeted server to send an ICMP packet back. This eventually uses up all the bandwidth for incoming and outgoing traffic and causes the server to crash. We can replicate this attack using a packet generator program called hping, which can be downloaded from most Linux repositories. See the command below where "*target_ip*" is the ip of the targeted network and "-1" utilizes the ICMP protocol:

sudo hping3 -1 --flood *target_ip*

Another common DoS attack is the SYN flood attack. This attack uses the Transmission Control Protocol (TCP) and floods the server with synchronize (SYN) packets. To establish a TCP connection, a device sends a SYN packet request to a server. The server then responds with a SYN/ACK packet to acknowledge the receipt of the device's request and leaves a port open for the final step of the handshake. Once the server receives the final acknowledgement (ACK) packet from the device, the 3-way handshake is complete and a TCP connection is established. Attackers can take advantage of the protocol by flooding a server with SYN packet requests and never fully completing the 3-way handshake. This attack can be replicated using hping with the following command, where "-d 300" is the amount of data in bytes you wish to send in the packet, "-p 80" is the desired port you wish to attack, the "-S" switch places hping in SYN mode, and "*target_ip*" is the ip of the targeted network:

sudo hping3 -d 300 -p 80 -S --flood *target_ip*

A standard DoS attack utilizing a single source of network traffic is usually not enough to cause any major disruptions, let alone crash a network. A DDoS attack is a Distributed Denial-of-Service attack. DDoS attacks are usually performed using botnets, a large collection of compromised private internet-connected devices infected with malware and controlled as a group. These compromised devices are sometimes refereed to as "zombies". Using a botnet, an attacker can send requests from these computers to have a larger impact on the networks bandwidth, making it easier to crash the target network.

8/26/2024

Create a Honeypot Using T-Pot

  ,,     ,,     ,,
  xx    _xx_   ,xx,
 /==\   /==\   /==\
(/==\) (/==\) (/==\)
  \/     \/     \/

Honeypots are virtual traps to lure threat actors. An intentionally compromised system allows attackers to exploit vulnerabilities so you can study them to improve security policies. Setting up your own honeypot is a quick and easy project especially when utilizing T-Pot. T-Pot is a free, all-in-one multi honeypot platform that uses 20+ honeypots on various ports and features countless visualization options to display data obtained from attackers.

We will be creating our honeypot on a cloud server hosted through Vultr. It is not suggested to host honeypots using your home internet. You can sign up for a Vultr account using my referral link here. This will give you $300 in credits which will allow you to host your honeypot for free for around 6 months when following this tutorial.

After creating your Vultr account, navigate to the top right of the dashboard and click the "Deploy +" button. You will be directed to the server deployment screen. For the type, select "Cloud Computed - Shared CPU". For the server location, select a region closest to your home. It is worth noting that selecting other regions may produce different interesting results as far as the number of threat actors attempting to access your server and their location. Feel free to experiment. When asked to select an image for your server, click "Ubuntu" and select the most recent version. When selecting a plan, click the "Regular Cloud Compute" option and select the 160GB SSD option. This option gives us the base requirements for running T-Pot. You may turn off all additional features for your server including Auto Backups and IPv6. You will then be asked to name your server under "Server Hostname & Label". Once done, click "Deploy Now".

On your Compute dashboard, once the status of the server is listed as "Running", click the server name to go to the server dashboard. Click the top right "View Console" icon to launch the console for your server where you will be greeted with the server login screen. Use the Username and Password credentials listed on the server dashboard. This will give you root access to your server.

T-Pot requires you to install the service using a non-root user. We will create a new user using the following command where "*username*" is your desired username:

adduser *username*

You will be prompted through the user creation process where you will set a password and other information regarding the user. Once the user is created you will need to give them sudo privileges using the following command:

usermod -aG sudo *username*

Once given sudo permission to the new user, switch to that user by entering the following command:

su *username*

You will now switch to your new user. If you have been following this tutorial you will be in the root folder and will need to enter the following command to move back one directory:

cd ..

Change directories using the command below where "*username*" is the name of your user:

cd home/*username*

This directory is where we will clone the T-Pot Github repository. We will first need to install Git by entering the following command:

sudo apt install git

Clone the Github repository using the command below:

git clone https://github.com/telekom-security/tpotce

Change into the tpotce/ directory:

cd tpotce

Run the installer:

./install.sh

Follow the T-Pot installer prompts. Installation will take a few minutes. When asked which type of T-Pot you would like to use, select Hive by typing "h" into the command prompt.

You will be asked to setup the web user information. This information will be used to log into the T-Pot web dashboard/command center where you will be able to access the collected data. Complete the prompt by entering in a username and password.

You will eventually be told the installation is complete and you may reboot your server. Reboot by using the following command:

sudo reboot

Once your server has been rebooted, you may close out of the Vultr console. Congratulations, your honeypot is up and running!

To access the web dashboard/command center for your new honeypot enter https://<your.ip>:64297 into your web browser where "<your.ip>" is the ip address of your server, which can be found on your server dashboard on Vultr. You will be prompted to log in. Use the username and password created during the installation of T-Pot for the web dashboard. You may receive a warning from your browser. You can ignore this. Once logged in, you will be greeted with your T-Pot web dashboard:

One of the most popular tools in T-Pot is the real-time Attack Map. This map displays attacks in real-time on your server. The interface displays the world map along with information on each attack including the service the attacker is utilizing and the location/ip address of the attacker.

The Kibana tool on T-Pot is a great way to see more in-depth details about the attacks being done on your server. When accessing Kibana, you will be asked to select a dashboard. Dashboards are broken up into the honeypot type. For example, selecting the Cowrie dashboard displays attacks using ssh/telnet on ports 22 and 23. 

To see the complete list of honeypots on T-Pot and their ports, click here. The T-Pot Github also has links to all the honeypots under Technical Concept where you can learn more about each one.

5/20/2022

FreeBSD: How to Install FreeBSD

               ,        ,
              /(        )`
              \ \___   / |
              /- _  `-/  '
             (/\/ \ \   /\
             / /   | `    \
             O O   ) /    |
             `-^--'`<     '
            (_.)  _  )   /
             `.___/`    /
               `-----' /
  <----.     __ / __   \
  <----|====O)))==) \) /====
  <----'    `--' `.__,' \
               |        |
                \       /
           ______( (_  / \______
         ,'  ,-----'   |        \
         `--{__________)        \/ 

FreeBSD is a free and open-source operating system known for mostly being utilized for servers. Prominent sites that run on FreeBSD include Netflix, Yandex, Hacker News, Yahoo! and more. FreeBSD can also be used as a Unix-like desktop OS when paired with a desktop environment like Xfce or a window manager like Suckless's DWM. This guide will walk you through the basic install of FreeBSD using mostly default configurations and some light explanations of the other configuration options available. If you would like a deeper understanding of FreeBSD, check out the great collection of documentation on FreeBSD's website. Note: You can click on any of the screenshots within this guide to enlarge them.

Start off by downloading the FreeBSD ISO file from FreeBSD's website under "Installer Images". This ISO file can be flashed to a USB flash drive using an application like balenaEtcher or used in a virtual machine like Virtual Box or VMWare. Remember to select the proper ISO file for your system. If you have a 64 bit processor download the amd64 ISO. 32 bit, use the i386 file.

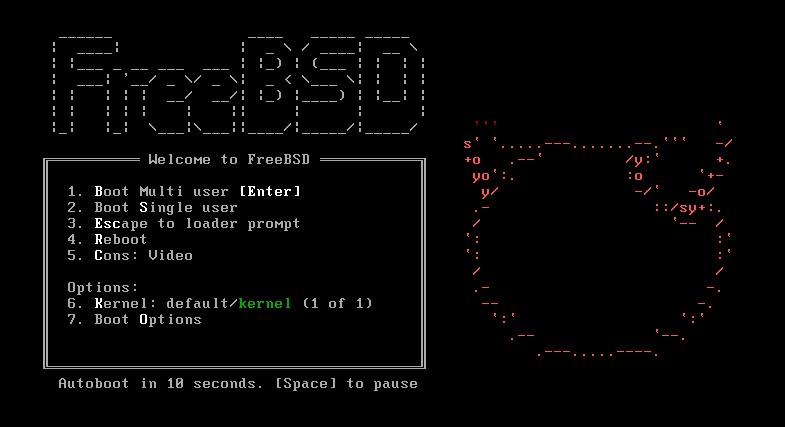
Once you boot up the ISO file using your virtual machine of choice, or you decided to go the bare metal route and have booted from your USB flash drive containing the ISO image, you will get the following screen:

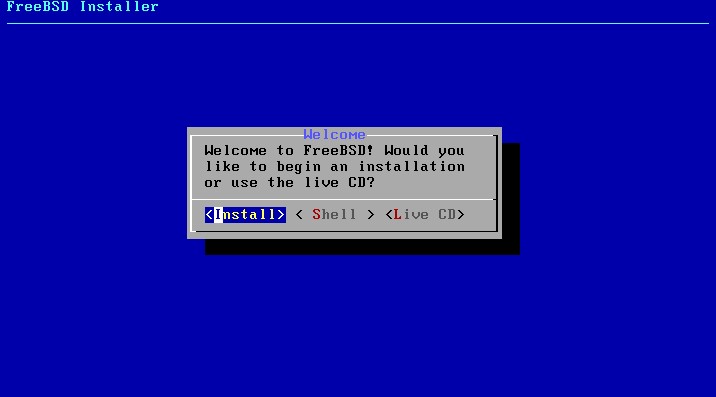
Press Enter, or you can wait for the autoboot feature to start the installer. You will land on the installer "Welcome" page.

Press Enter. During the install you may select different options using the arrow keys. In this install tutorial, we will be mostly sticking with the suggested settings for a smoother experience. After pressing Enter, you will receive the "Keymap Selection" screen.

Select your desired keymap settings using the arrow keys and press Enter when you wish to proceed to the next step in the installer. Your keymap setting should be the closest option to your keyboard connected to the system.

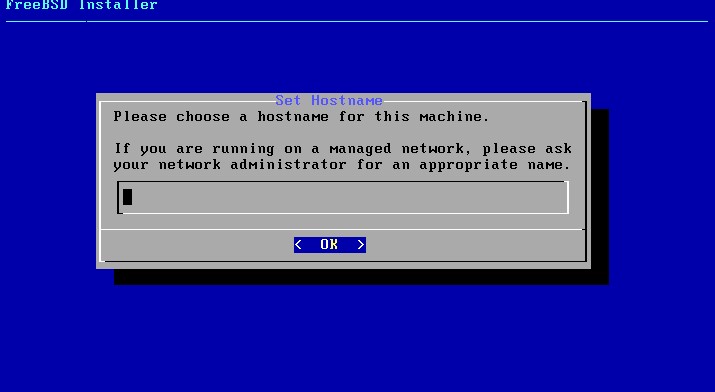
We will be instructed to enter a hostname. The hostname can be whatever you desire for your system. I usually go with the name of the OS or distro. Once you have your hostname selected, press Enter to continue.

The "Distribution Select" screen will list different components we can install to our system. The preselected options should suffice. Press Enter to move on to partitioning.

Use your arrow keys to select the "Auto (UFS)" option. This option will set up the disk partitions using the UFS file system. You also have the option to set up custom partitions for dual-booting using the "Manual" option, as well as using the "Shell" option to partition using the command line. Press Enter.

The next screen that displays is the "Partition Scheme" option. If you are using a modern day system with hard drives exceeding 1TB, I suggest selecting GPT (GUID Partition Table). For anything below, MBR (DOS Partitions) will work fine. Press Enter to move on.

After selecting your partition scheme. you will be faced with the "Partition Editor". You can make edits to your partitions here if you wish. We will stick with the set options and press Enter. The installer will ask you to commit to the partitioning. Press Enter again to continue.

The installer will now display the install progress while fetching, unpacking, and extracting files needed for the distribution. This may take a little while, but since FreeBSD is fairly lightweight, it should take no more than 10 minutes even on slower, older hardware. Once the install is finished you will be instructed to set a password for the root user.

Enter a strong password for your root user and press Enter. Re-enter the password and press Enter again to move on to setting up your network configuration.

The "Network Configuration" screen is pretty straightforward. Select your network interface and press Enter. A few other network configuration settings will display regarding IPV4, DHCP, IPV6, and SLAAC. You can continue to press Enter with the default options for these until you arrive at the "Time Zone Selector" screen.

Select your region from the list using the arrow keys and press Enter. You will then be prompted to select a country and then a time zone. Once this is completed you will be given the option to select a date and set the time manually. This information should be automatically synced to the time zone you selected on the previous screens.

Following the time zone options, you will have the option to configure system services that will be started at boot. I suggest only selecting services you will actually use. The"sshd" and "dumpdev" services are preselected and are all we should need to get our system running. Press Enter.

The "System Hardening" screen displays security options for hardening your system. To get a better description of these options and to see if any of these might be of use to you, I suggest reading section 2.8.4. Enabling Hardening Security Options in the FreeBSD Install Guide. Press Enter once you have selected the options you want enabled to continue on to adding a user to the system.

We will be prompted to enter a username for our user along with other settings. Most of these settings can be left as default by pressing Enter and continuing through the process. I do suggest creating a custom login group set as "wheel" to be used for su permissions later. Once you set your user password and press Enter, confirm your user information by typing "yes" and pressing Enter. You can then add more users or continue to the "Final Configuration" screen.

The "Final Configuration" screen allows you to modify any configurations created during the install.  If you are satisfied with your settings press Enter. You will be asked if you want to make any manual modifications to the system using the shell. Select "No" by pressing Enter. 

A screen will then appear saying the installation is complete and give you the option to reboot. Select the "Reboot" option by pressing Enter. Remember to remove the ISO image file from your virtual machine program or remove the USB containing the ISO image from your computer to prevent your system from booting into the installer. Once your computer reboots into the installed system you should be able to login using any of the user or root account credentials created during the install.